
While working on the game Front Line Zero with the METATEK game developement studio, I’ve used the Unreal Engine 4 game engine for some years now.
I’d like to share some knowledge about the pitfalls and neat tricks I got to discover under the form of short, easily-readable blog posts.
Today’s topic : how to integrate SVN over SSH in an Unreal Engine 4 project, and ultimately why we walked away from SSH.
Contents
The Binary File Conundrum
In case you didn’t know, a version control system will have to deal with mainly two different types of files : plain text files, and binary files (also sometimes called BLOBs – binary large objects) like pictures and any other kind of proprietary file formats (like PDF…). Plain text is what’s easily readable by humans and, guess what — by version control systems too ! They are the easiest to resolve conflicts about, when two separate versions of a file diverged for example.
Binary objects are a whole other can of worms, because since they are a seemingly random assembly of bytes, it’s hard for a third party VCS to reliably figure out how the changes of two conflicting versions of a binary file should be reconciled together. That’s why these files are sometimes deemed unmergeable : two people cannot safely work on the same one at the same time. If you do, at the moment you have to check in your work to the server, if someone else worked on the same file in the meantime, one of you will lose work : either the other version is « authority », but it doesn’t have your changes, or your version is authority, but you don’t have the other person’s change. In this kind of context, someone is going to have to redo work at the end of the day !
Turns out, VCS are actually pretty bad at managing binary files in general. To put it another way, remember Git is a decentralized VCS, which means each time you clone a repository, you actually clone not only the last version of the file tree, but also the whole history of modifications for every single file that was tracked by Git, because since it’s decentralized, Git is designed to be completely self-sufficient once the project has been cloned (there is no need to talk to a central server of any kind, except to share new work progress).
In theory this is all fine, except when you encounter projects like video games that can be, depending on the game, a shit ton of binary files and comparatively much less plain text files (like config files or source code). When a binary file changes, VCS are usually smart enough to only store the binary diff between each version. But Git has you download each and every version each of your binary files has gone through their history !
That’s why usually Git is said not to be very suitable for projects with a large amount of binary files. It completely bloats your hard drive space and repository size on the client side because of all the (usually useless) history you’re carrying for your binary files, especially considering that it is pretty uncommon to work with a previous version of a binary file — since they are unmergeable, one cannot easily run a diff of two different versions of the file, and easily say « oh ok that’s what changed ».
Some VCS like Subversion (aka SVN) or Perforce solve this problem by adopting a more « centralized » approach to files, which means the client is in contact with the server much more than with Git. It allows, for example, to only check out the current revision of a whole repository tree on the client. If you want to check out another version of a given file, just ask it to the server. But it doesn’t work that way with git, so how did the Git community solve that issue ?
Git LFS to the rescue ?
After some years using Git, which is still my preferred VCS of all time to work with any kind of project, I decided I should install Git LFS on my server. Git LFS (which stands for Large File Storage) is a nice addition to Git to make it handle binary files in a « smarter » way than the default. Basically, it’s an HTTP server that runs alongside git, that also has a separate client you have to install on user workstations.
Once properly configured, it serves binary files at the revision you’re asking it. The biggest feature of this system are the so-called « LFS pointer files », which are very small plain text files containing a checksum that Git LFS replaces your binary files with. The big advantage of that system is that you no longer have a shit ton of binary files in your Git history ! On the git repository, you actually only have LFS pointer files. Then, at cloning time, git and LFS communicate with each other to only get the relevant version of the binary file at the latest commit. Clever ! It avoids the user to download a trillion of binary files’ history that may be completely useless for day-to-day usage.
Unfortunately, after some time, Git LFS quickly revealed itself to be the weak link of our infrastructure. Poor documentation, poor integration with standard git (in my opinion) and kinda arcane ways to make it work server-side made it a hassle to work with and introduced a lot of issues, like clone timeouts that needed to write a script to repeatedly restart the cloning process in order to complete the repo initialization, LFS pointer files not fully resolved, and overall sluggish transfer speeds… At this point, I’m not sure who to blame between the performances of our small server (a basic OVH VPS), git LFS misbehaving, or the sheer amount of the data that we throw at it (our UE4 project is quite big).
It stays that performances were not good and we were having a hard time using it. Onboarding new people on the team was particularly tedious, and cloning the project for the first time never worked on the first attempt.
At that point, since another teammate already successfully worked on a UE4 project using Subversion, and that SVN is known to have a « saner » way to deal with binary files out-of-the-box than Git, I decided to give it a try. Working on a small video game project, the centralized approach of SVN doesn’t really bother us anyway : everyone works on the « master » branch most of the time.
Dealing with SSH is such a pain in the *ss
On the server side, installing SVN on Linux is pretty straightforward. The official documentation does a pretty good job at taking you by the hand to tell you how to do it. I had no use for the website view (we are not an open source project), so I didn’t install the whole Apache framework that most tutorials want you to install. I instead went for the more lightweight approach of just running the more barebones utility svnserve.
A problem that we faced early on is that we were used, with Git, to use SSH key-based authentication, which is a win for enhanced security as it doesn’t have you store passwords in plain text somewhere and it has the nice added bonus to encrypt all network traffic between the user and the server.
The first problem we faced is that, if SSH and using SSH keys is very well integrated in git and a kind of no brainer nowadays (GitHub for example deprecated password authentication), it isn’t the case with SVN, with which it’s historically much more common to use a pair of username/password as credentials.
I realized « the hard way » that unlike git, it isn’t easy to setup the whole environment in order to let SVN work over SSH. After the lengthy introduction of that post, here is the main topic : how I finally got it working.
Prerequisites
This article focuses on making SVN+SSH work for an Unreal Engine 4 project on Windows. YMMV if you’re not in the same working conditions.
You will need to install a few softwares first :
- TortoiseSVN, which serves as the SVN integration into the Windows File Explorer and the basic GUI frontend for all SVN commands : https://tortoisesvn.net/downloads.html
- PuTTY, which is a terminal and remote connection utility that is used in the backstage by Tortoise to handle connection via SSH. We will use it as a SSH session handler and « SSH key ring ». https://www.putty.org/
Configuring PuTTY
In the following, I’m going to assume you already have an OpenSSH private key file you generated with a tool such as ssh-keygen for example. PuTTY also knows how to generate keys, but for some reason, it never seemed to work for me, so I just generate the keys with ssh-keygen ahead of time.
The first thing you need is to convert your private SSH key file to the PuTTY ppk format. In the backstage TortoiseSVN uses PuTTY to authenticate with SSH, and PuTTY only knows how to read PuTTY PPK files. Fortunately this is easy to do.
- Locate your standard OpenSSH key in the .ssh directory of your user folder. It is usually named “id_rsa” but it depends on the name you gave it.
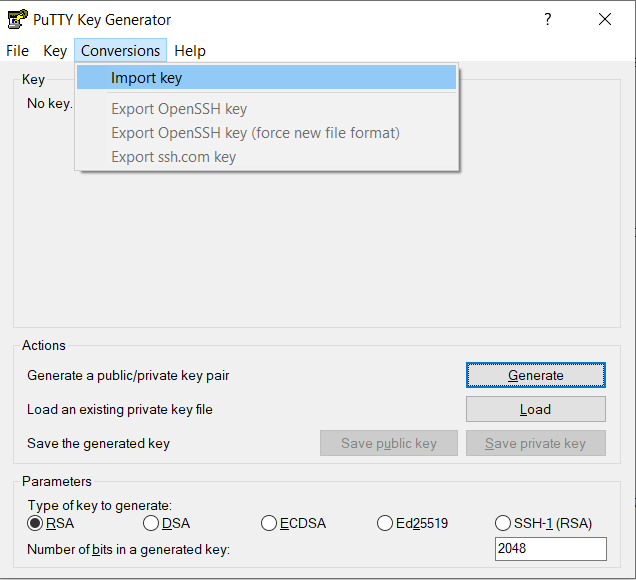
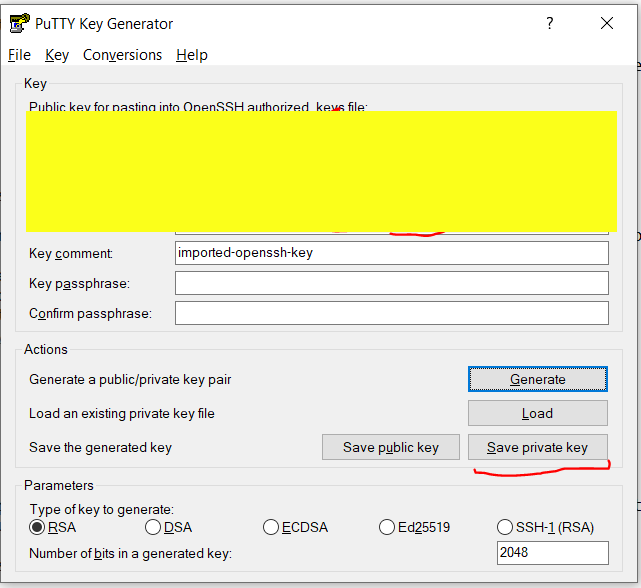
- If you installed PuTTY properly, you should have PuttyGen installed too. Start the PuTTYgen program and in the “Conversions” tab, choose “Import key” to select your SSH private key (id_rsa for example). Then, just click on the “Save private key” button to save the key in PuTTY’s .ppk format. It’s going to be useful later on.
Next, you have to go in PuTTY in order to save your SSH authentication informations. You’re going to save these informations into a PuTTY session so that SVN doesn’t ask you to authenticate every time you connect to it. It is kind of a UX nightmare but fortunately this has to be done only once.
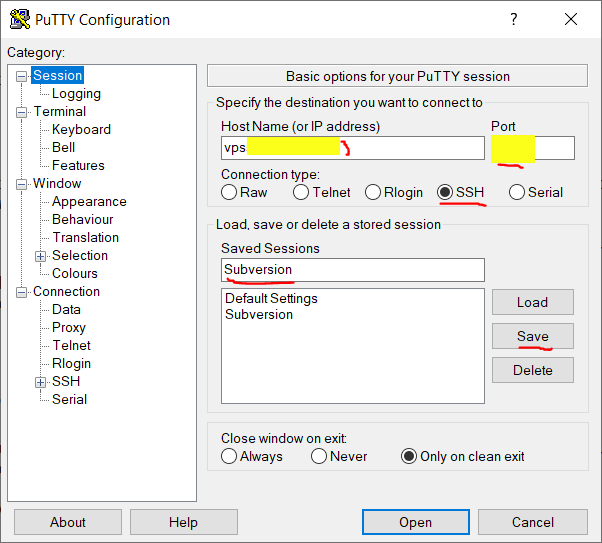
Open PuTTY and start filling the correct connection information. Please note :
- Host name is the domain name of the server where you installed SVN
- The port is the port where SSH listens on the server (by default, it’s 22 for SSH)
Then, you can save your session. In order to do that, type a name into the “Saved Settings” box (I called it Subversion), then click on the “Save” button. If it works, you will then have a Subversion entry in the Saved Settings list box.
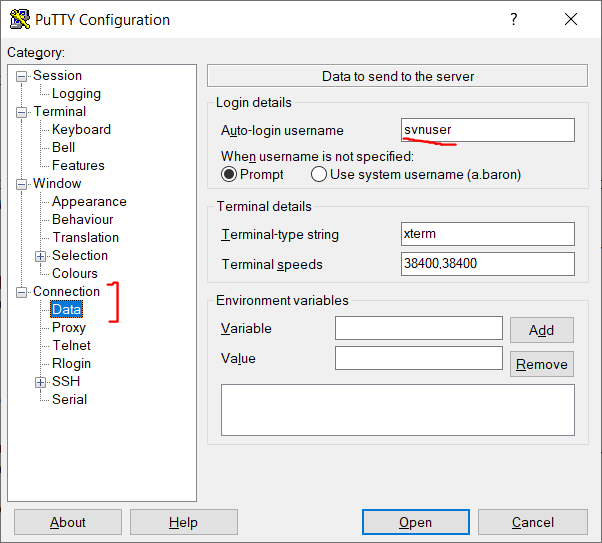
Then, you still have a bit to do. Just like for Git, the way the SSH connection works with SVN is that all SVN users will actually share a common access to a system user on the server that has the rights to access the SVN repositories. In Git this user would typically be called « git », here I decided to name it « svnuser » (choose one for yourself !).
In order to not get asked which user we log in for every time, specify this username in the Auto-login username box of the Connection – Data menu.
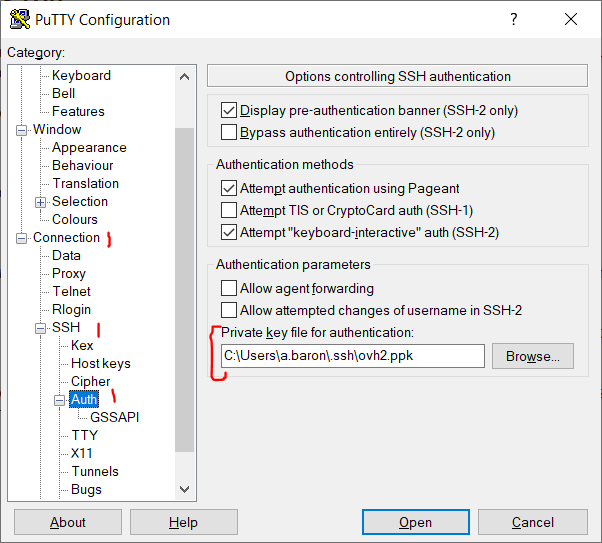
Finally, you also have to specify in PuTTY which private key you want to use in order to connect to the svnuser. It’s easy : it’s the PPK file you generated previously. This setting can be found inside the Connection – SSH – Auth submenu.
After that, you’re all set, but don’t forget to hit that Save button in the Session main menu one last time, or you’ll have to do these things over again at some point.
Configuring TortoiseSVN
In and of itself, there’s not much to do with TortoiseSVN.
If you installed it properly, right-click anywhere on an empty space in a folder of the Windows file explorer, and you’ll see TortoiseSVN contextual menus that will let you control your SVN repository and Tortoise in general.
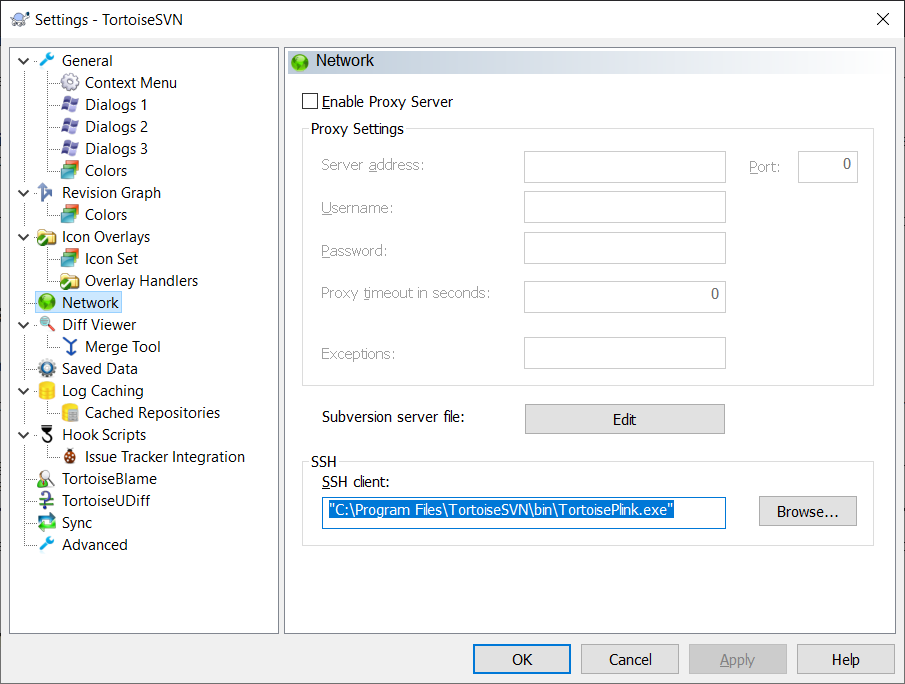
Now go to the TortoiseSVN – Settings submenu to open TortoiseSVN settings. As a quality of life improvement, we wanna set the SSH client to TortoiseSVN’s own SSH client because it has the advantage of being better integrated with TortoiseSVN and also doesn’t pop a lot of OpenSSH consoles everywhere when we use it. It should be used by default, but it’s better to make sure. This tool is named TortoisePlink.
In the settings, navigate to the Network submenu and under SSH client, browse to the location of TortoisePlink.exe. On a standard installation, its path should be : “C:\Program Files\TortoiseSVN\bin\TortoisePlink.exe”.
Configuring your environment
Almost done !
Now that we configured TortoiseSVN, I figured out there’s another important step before we try anything with the UE4 project.
Indeed, UE4 doesn’t know by itself that it must use TortoisePlink as its SSH client. If it doesn’t, the connection will fail and you’ll be unable to use the SVN integration into Unreal.
Fortunately, it’s not that hard. All you need to do is adding an environment variable, which is kind of like a global key/value setting that stays in your system. Every program can try to read the value of an environment variable in order to configure itself.
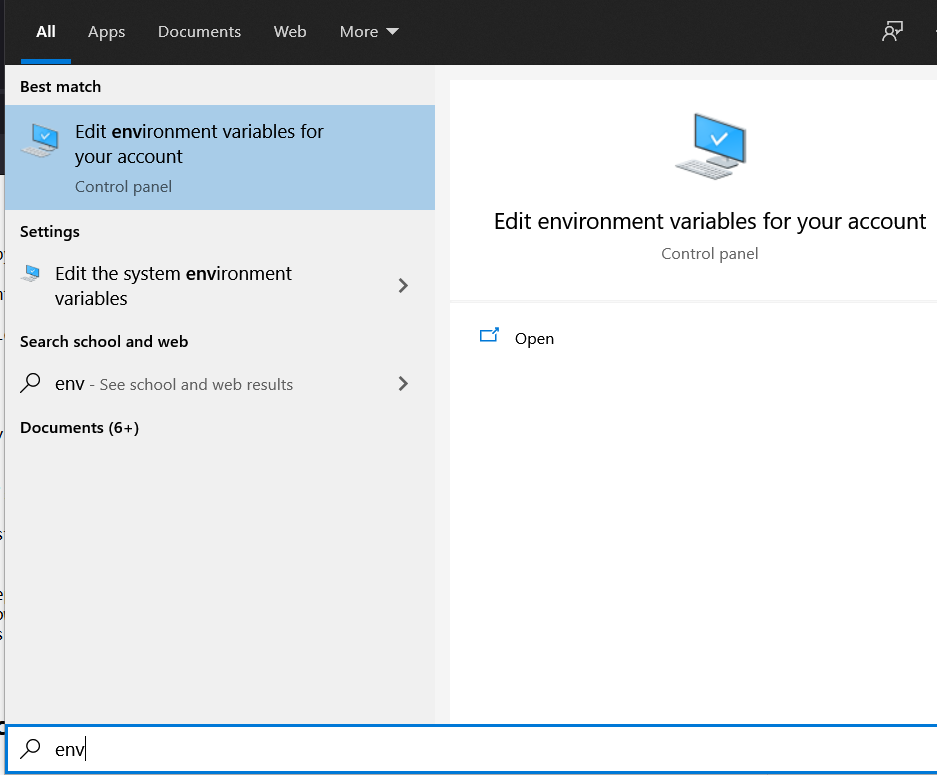
Under Windows, hit the Windows Button and start typing env. The menu to add an environment variable will probably be your first choice appearing.
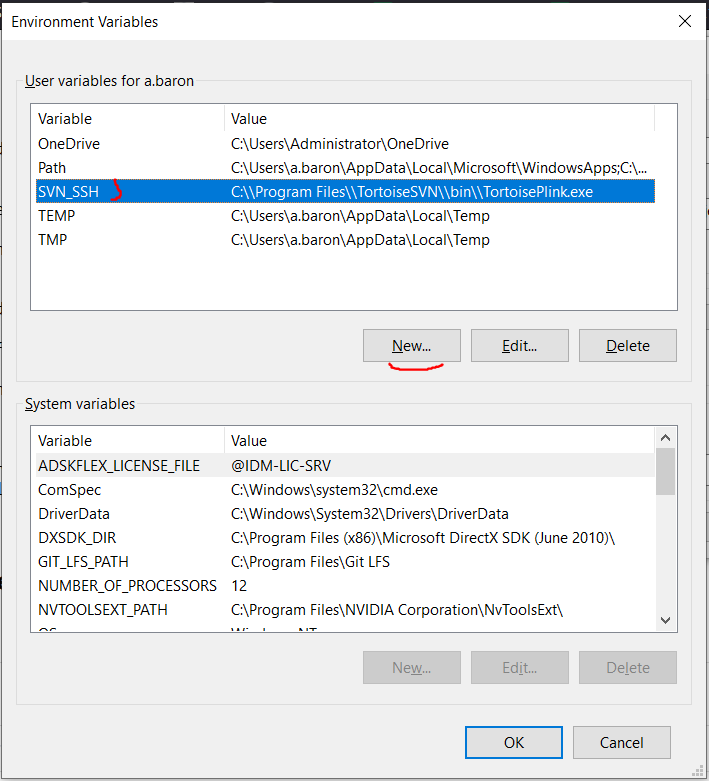
Then, in the Environment Variables menu, all you need to do is hit the New button, and as Variable name, choose SVN_SSH, and as Variable value, copy-paste once more the full path to the TortoisePlink.exe executable.
This should be enough to let UE4 know that it should use TortoisePlink as its SVN client.
Checking out the project with SVN
Great ! Everything is almost set up to work with SVN in UE4.
But before you can start using SVN with UE4, you have to download a copy of of your game to your hard drive. Here, I assume that some administrator already did all the heavy lifting of doing the initial commit of the whole project for you.
To do so, put yourself in an empty directory of your choice, right-click on an empty space and choose “SVN Checkout…”.
If you’re not used to SVN parlance, a SVN checkout is the equivalent of a Git clone. It will connect this folder to the server’s SVN repository, download the whole contents of the repo and create a .svn hidden folder in that directory to track the repo’s activity.
In the URL of the repository to clone, note that :
- You must use the svn+ssh protocol
- You must use, as an URL, the name of the session you previously configured and saved inside PuTTY. In my example, it would be “Subversion”, but it depends on what name you used.
Finally, add a slash and the name of the repository. The name of the repository is the folder that you created using the svnadmin create on the server. For our game, it’s “flz”. Here’s how the whole thing should look like :
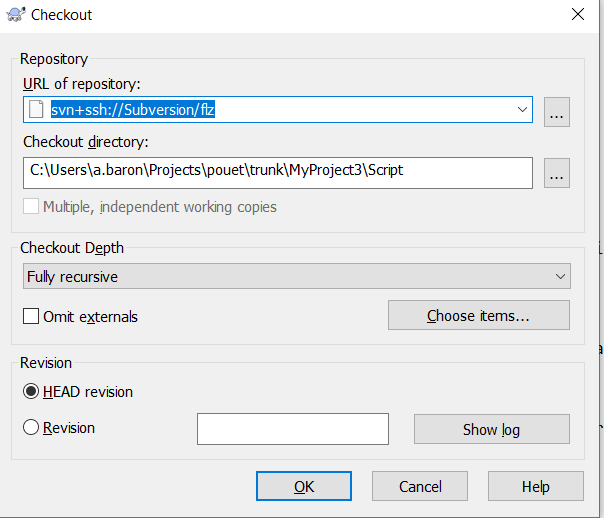
Note that the way I have set up the working tree of the SVN, I adopted a pretty standard SVN tree, with three directories trunk/, branches/ and tags/ at the root of the repository. Basically, the only one you’re interested with is the trunk. Below will lie the Unreal project’s folder and everything you’re used to work with : inside trunk I only have a folder containing the game (like : trunk/XAO) and inside that folder, I have the uproject and all associated files (like : trunk/XAO/XAO.uproject, Content, Source etc.). I’m not 100% sure if that’s necessary to make it work or not, so you may need to give it a try 🙂
In SVN terminology, your local version of the repository is called your working copy.
Configuring the Unreal Engine 4 project
Finally ! Unreal is a very powerful game editor that comes with a source control system integration available for Subversion.
It means that you can control SVN from within Unreal. You may still need to use TortoiseSVN sometimes, but it sure is handy.
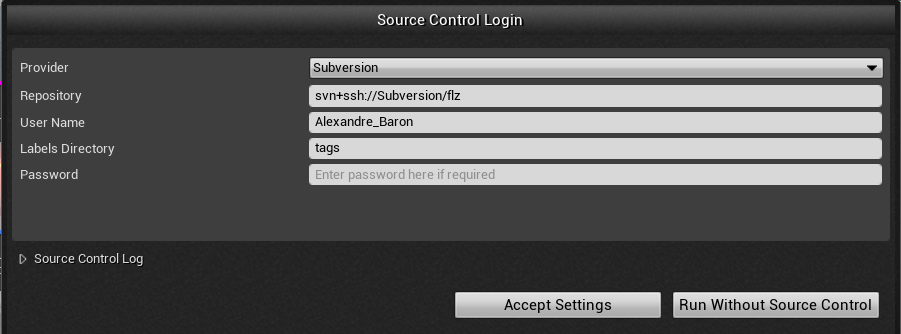
In order to do that, click on the big Source Control button at the top of the editor and choose Subversion in the Provider entry.
Then, set it up with the same URL that you used to check out the repo. As a user name, you must enter the user name that is matched to your SSH key on the server, otherwise the connection will work, but Unreal will think you’re someone else and kind of lock you out of editing your own files. Be careful and make sure you use the right one. SVN is more server-centric than Git in that regard, user names are much more important to identify who is doing what. Leave the Labels directory to “tags” and password empty.
In case you would wonder where that username comes from, I set it up in the command used when the user authenticates to the server using their SSH key. In the svnuser’s authorized_keys file, I wrote something like :
|
1 |
command="svnserve --compression 0 --memory-cache-size=4096 --cache-txdeltas yes --cache-fulltexts yes -t --tunnel-user=USER_NAME -r /home/svnuser/repositories",no-port-forwarding,no-agent-forwarding,no-X11-forwarding,no-pty PUBLIC_KEY_CONTENTS... |
Replace USER_NAME with your actual user name and PUBLIC_KEY_CONTENTS by the SSH public key of the user. The username will be the one actually used when committing with this SSH key (we do not want everyone to commit as « svnuser » !)
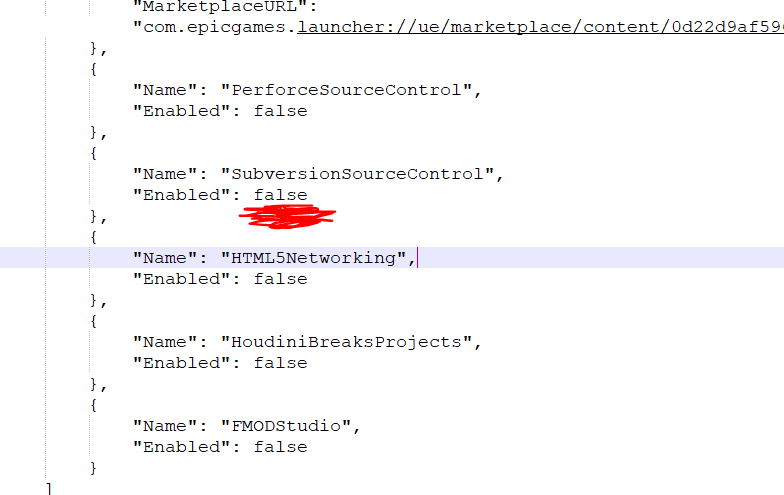
I also had a stupid problem where this Subversion option was just not showing up in the dropdown list. Don’t be a dumbass like me and make sure this is enabled (i.e. set to true) in your uproject file :
You can then start using SVN from within the editor. More info on that in the official Unreal source control docs :
Locking binary assets
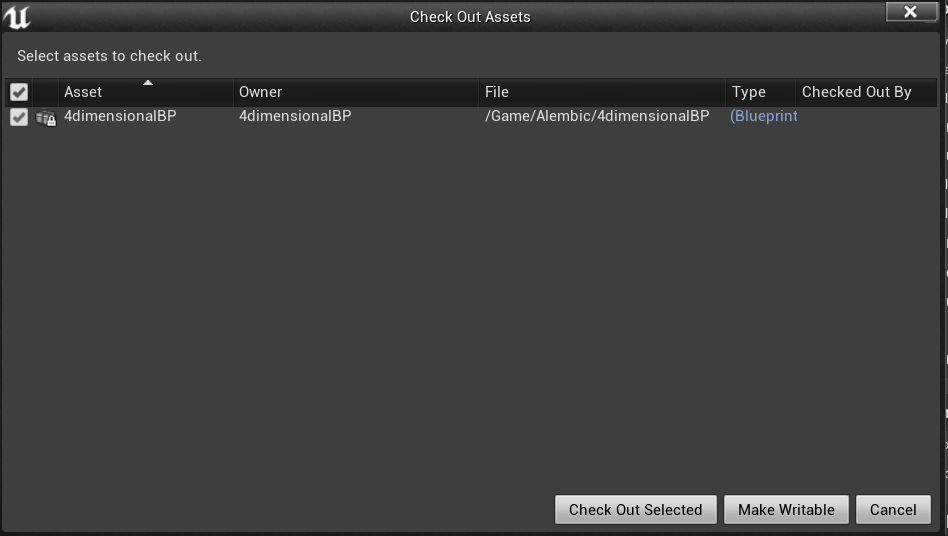
Be aware that SVN can let you « lock » files to make them read-only to all other users (git LFS also added this feature not long ago). It’s particularly interesting for files like uassets (i.e. Blueprints, Meshes, and basically everything in your Content Browser) and umaps (the Levels) because as you may know, those files are binary, as opposed to plain text. It means they cannot be easily merged. Hence, if two people work on the same file at the same time, and then try to send their work on the server, since the two versions cannot be reconciled, one of the two persons will have to lose their work to stay up-to-date with the repo, accepting the other person’s version and redoing their work on top of it.
The file locking system is supposed to prevent this kind of thing. Basically what happens in Unreal is each time you try to modify and save a binary asset (like a Blueprint), it’s going to prompt you to “check out” this file, which basically means you’re locking that file in order to keep exclusive access to it as you’re modifying it. As a result, no one else will be able to modify that file and push their version to the server, so no conflict will be possible. If someone kept a lock on a file you absolutely have to edit right now, you can also use the “Make Writable” option which unlocks the file on your computer, but won’t let you send it on the network as long as someone else possesses the lock on that file. Unreal is supposed to be able to tell you who is locking a specific file.
In order to do that, you need to setup a property on the root of your repository. SVN properties are basically a way for SVN to store particular metadata on files, and those properties can actually be committed and pushed to the server as part of a new revision of the repository tree. For example, if you want a user to lock a file before being able to edit it, the svn:needs-lock property on that file needs to be set to something. But it would be tedious to have to go in TortoiseSVN and set this property manually for each asset that you create !!
Fortunately, with latest versions of SVN, there are a couple of « inheritable properties » that you can set once at the root of the repository and they will automatically apply to any new file that matches a rule that you define. Here, the one you are interested in is svn:auto-props. Just go back to the root of your SVN repository (where there is the .svn folder), and right-click on an empty space of the explorer in order to get the TortoiseSVN contextual menu and find the Properties menu.
You will then need to hit the « New… » then « Other » button in order to set a new property. This is what I set in mine and it seems to work as expected :
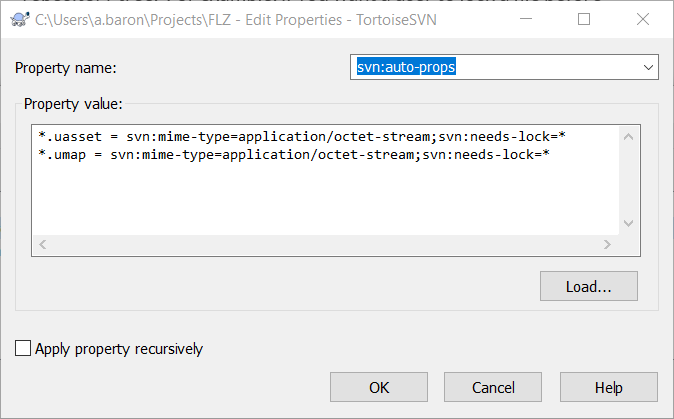
I have to warn you that in my experience, it doesn’t apply retro-actively : it only applies to the files that you will add to SVN after setting this property. So I advise this to be your very first action on the repo actually, so that it automatically propagates to any files you would create afterwards !
Ignoring files
A great feature of Git is the .gitignore file, which is an handy and easy way to say that you’re not interested in tracking specific types of files. It’s just a plain text file that you put in your Git repository.
Such a thing doesn’t exist in SVN. But then again, inheritable properties come to the rescue. There is a fairly new one, svn:global-ignores, that will fulfill the same purpose for our needs. It works exactly the same as a .gitignore file, except it comes under the form of a SVN repository property. Again, since this is something you probably want to apply to your whole repo, go to the root of your SVN repository (where there is the .svn folder), and right-click on an empty space of the explorer in order to get the TortoiseSVN contextual menu and find the Properties menu. Now, create the svn:global-ignores one and put in it typically the same thing that you would write in a .gitignore file. This is what I have for example :
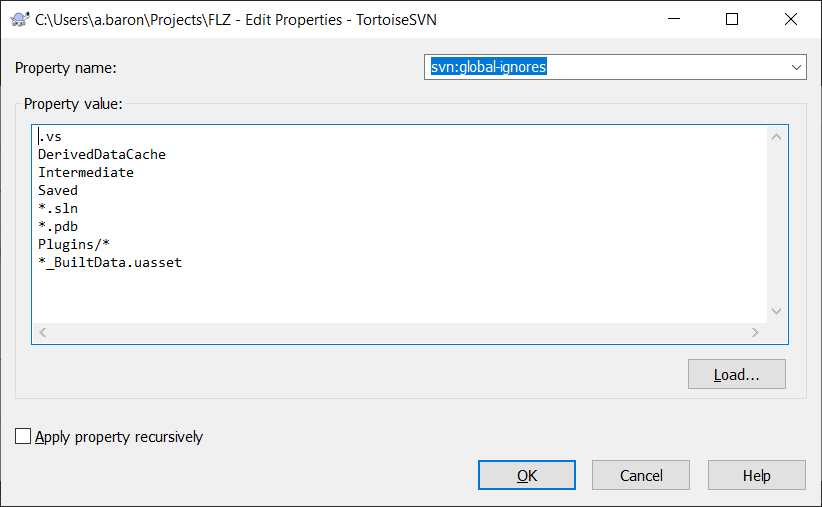
The ignored files and folders will never be subsequently added or committed by SVN. Very handy !
In conclusion
As you can see, there is a number of complicated steps to take in order to make SVN work with SSH in comparison to Git. In my opinion, it goes to show that SVN is, historically, not very enclined towards SSH authentication like Git is. The more common way to use it is with a pair of username/password credentials.
But we got SSH working in the end, so how come we decided not to use it ?
After some days, we realized some of us experienced really poor transfer speeds, and that was probably due to the ssh daemon taking up 100% of one of the server’s CPUs.
Since it was pretty clear this was probably our performance bottleneck, and the installation procedure was tedious anyway, I decided to stop using SSH with SVN and simply use the svn:// protocol instead with credentials. We went from a multi-step, complicated setup to a simple « enter URL, enter credentials, download and boom, it works » workflow.
In addition to solving all our problems and being a much nicer workflow for everyone, it also went with the additional bonus that transfer speeds massively increased (in some cases we’re talking about a 20x increase!)
I wrote this up for future reference in case it would be useful for someone. We are sticking with SVN so far. We will see over time if it reveals itself beneficial for our team or not…