
While working on the game Front Line Zero with the METATEK game developement studio, I’ve used the Unreal Engine 4 game engine for some years now.
I’d like to share some knowledge about the pitfalls and neat tricks I got to discover under the form of short, easily-readable blog posts.
Today’s topic : how to make a C++ enum that displays as an editable bit flags value in the editor.
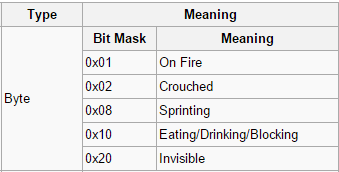
Bitflags are a very common tool in the programmer’s toolbox. They are basically a clever way to pack a lot of information inside a single variable, usually an integer or a plain unsigned byte.
For example, if you want to enumerate all possible states of an enemy, using a bit flag unsigned byte value gives you 255 possibilities ! So usually much more than you will ever need.
Another interesting property of bitflags is that you can combine multiple flags (or bits) together to express any combination of different states being set at the same time. It is helpful if, for example, you want to specify which kind of actions an AI must be able to do, and you want to be able to mix and match any kind of combinations to see what’s the end result
This is a major departure from a system using a plain enum for example, because enums are designed to represent and hold only a single value at a time.
So how to program a value in C++ so that it behaves like a bitflags value inside the Unreal Engine editor ? Turns out it’s more tedious than you could think, and if you miss even a single step, it won’t work.
First, create a UENUM that has the Bitflags metadata specifier. Making it a BlueprintType can be a good idea if you want to be able to make Blueprint variables with it.
|
1 2 3 4 5 6 7 8 |
UENUM(BlueprintType, Meta = (Bitflags)) enum class EShieldLevel : uint8 { None = 0 UMETA(Hidden), Basic = 1, Fire = 2, Electric = 4 }; |
Note a few things : first, UENUMs can only be based on unsigned byte enums (or the compiler will yell at you), so in order to do that, you use an enum class.
Also note that you have to provide a null value (= 0). In my case, I didn’t want the null value to show up in the editor, so I just used UMETA(Hidden) on this particular value to keep it from displaying.
Finally, as we’re dealing with a bitflag here, each value of the enum has to be a power of two. It makes sense when you think about it : we encode each information in binary, and each bit of a binary number represents a power of two. This is mandatory because if you forget it, the enum will just automatically add 1 to the previous entry, and your bitflag will be broken. Some people prefer to specify it in « bit shift style », like 1 << 0 for 1, 1 << 1 for 2, 1 << 2 for 4, etc… which amounts to exactly the same (and at no runtime cost since this is the kind of computation the compiler can statically resolve at compile time).
Then, you have to declare an uint8 UPROPERTY in your class of choice, using two very important metadata specifiers : « Bitmask » and « BitmaskEnum ». Fail to provide either one of them and it doesn’t work. BitmaskEnum requires you to specify the name of your previously created enum class type, so in my example for instance it would be « EShieldLevel » :
|
1 2 |
UPROPERTY(EditAnywhere, Category = TestBitflag, meta = (Bitmask, BitmaskEnum = "EShieldLevel")) uint8 ShieldType; |
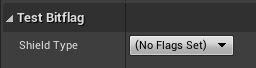
If you’ve done it properly, that’s basically it ! Now if you open the editor you will see something like that (hot reloading may not work : you may have to close and restart) :
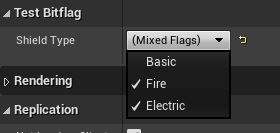
The editor now treats this enum as bitflag, which means it lets me tick multiple values at the same time, like Fire and Electric for example to make a shield resisting both fire and electricity :
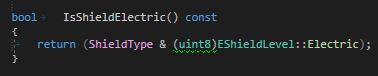
Finally, when you want to check in your code which option was enabled, it’s really the same as for any bitflag : just use bitwise operations like binary AND to figure out if a specific option was enabled or not :
I needed to thank you for this good read!! I absolutely enjoyed every bit of it.
I have got you book-marked to check out new things you
post…
This site was… how do I say it? Relevant!! Finally I’ve found
something which helped me. Kudos!